donderdag 29 augustus 2013

Accauracy is not easy! Friday finishes

I have been busy two days! with this block for the Aiming for accuracy quilt along. What I learned the most is that piecing is a synonym for 'patience'.  First time I did not read the tutorial well and I finished with totally different blocks. Second time I did read the tutorial well but I made the same mistake. This time I decided not cut the blocks up to dolls quilts, but I ripped the seams and saw the seams again. What a job., but it is done.

Ik ben twee dagen bezig geweest met mijn vierde blok voor de Quilt Along, waarin je leert accuraat blokken te maken. Wat ik wel geleerd heb is dat je geduld moet hebben en de tutorials niet alleen goed moet lezsen, maar ook tijdens het naaien even terug moet kijken. Anders eindig je net als ik tot twee keer toe met een verkeerd blok.

Another thing I learned is that my sewing machine, Husqvarna Emerals 183, is OK for free motion. No tension problems at all. This machine is a work horse  that will be working for hours and hours without a problem, when I like to fmq. But sewing seams when I am piecing is not going that easy. To much problems at the beginning and the end of a seam and when I had to sew more layers. I had to go back to the shop to ask what I can do about that.

Verder heb ik geleerd dat mijn Husqvarna Emerlas 183 een werkpaard is als ik bezig ben met free motion quilten, maar met het naaien van blokken gaat er steeds van alles fout. Het draad loopt vast bij het begin van een naad, de stof trekt scheef bij het begin en het eind en als de naald door meerdere lagen moet, loopt de stof niet door!

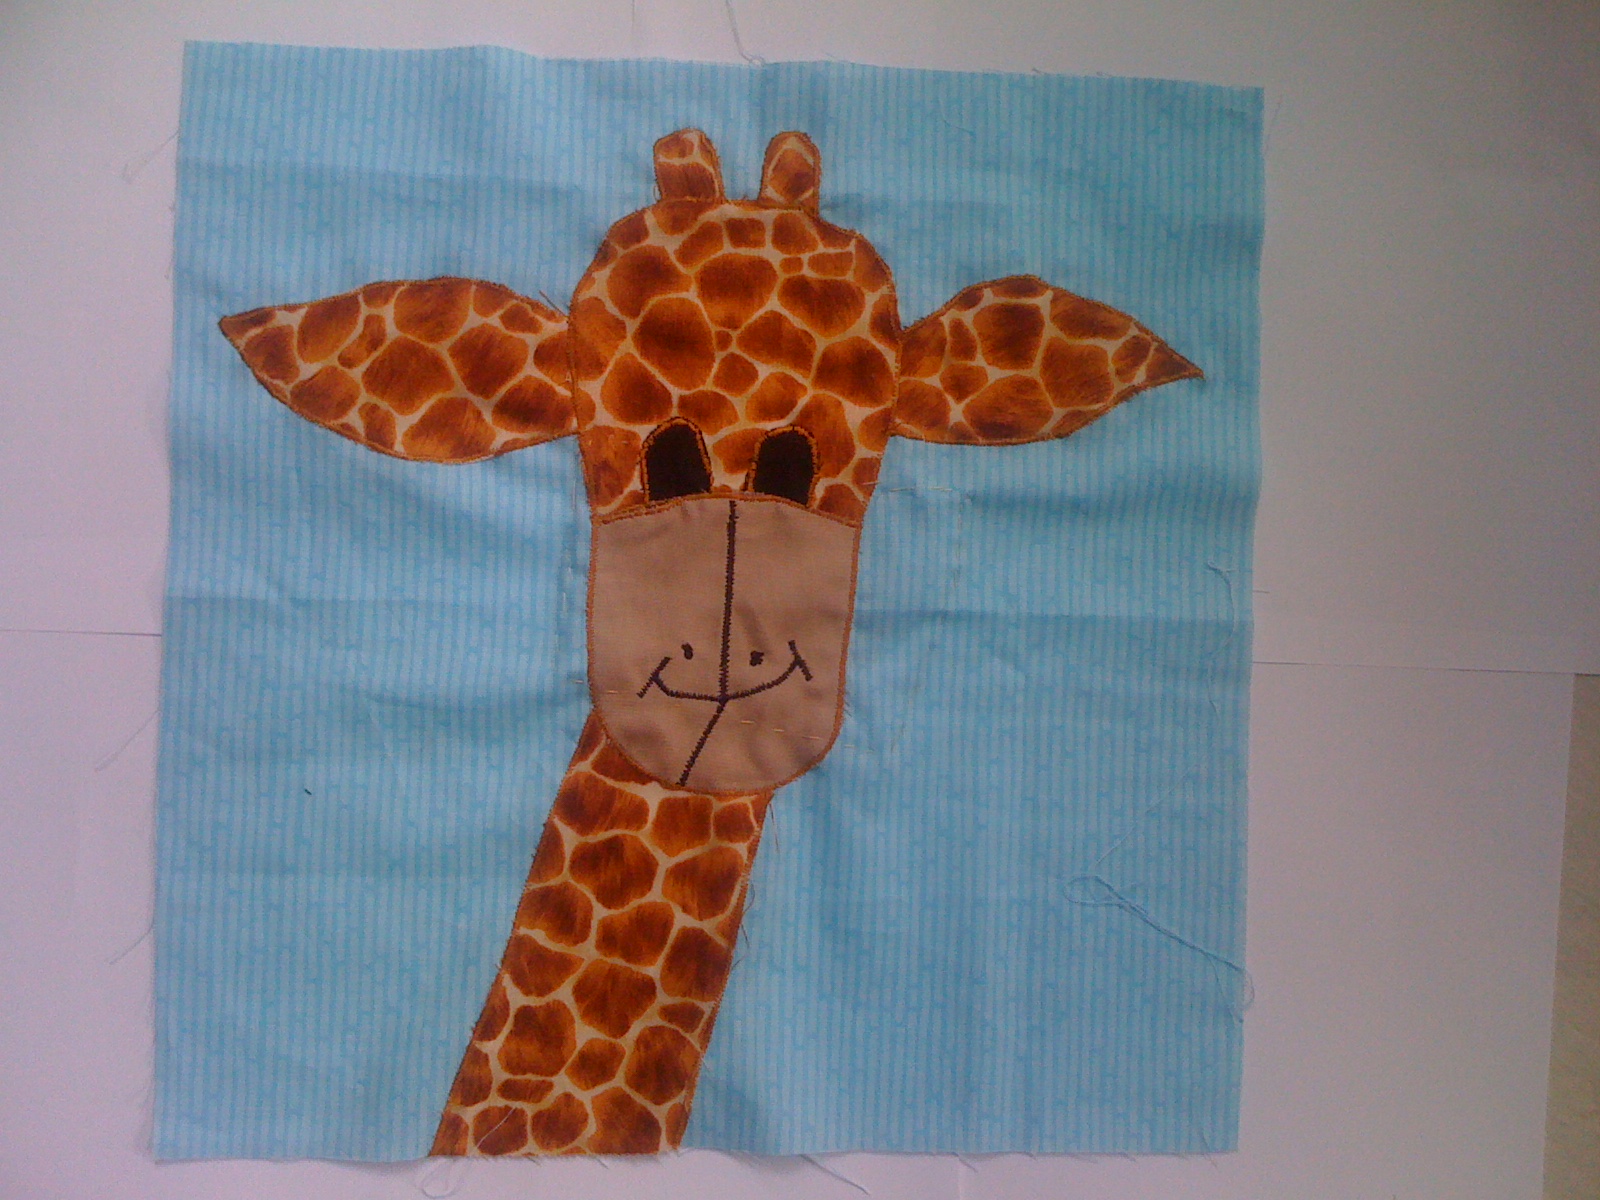
The block I finished today. The green centres are OK, almost perfect, but the yellow centres far from that!  De groene puntjes komen mooi bij elkaar in het centrum van de blokken, maar dat is me niet gelukt met de gele puntjes!

OK

Far from OK! Dat had beter gekund!

I finished this week four blocks of the Quilt Along. Enough. I bought some black and white cotton for free motion quilting. I like to sew swirls, feathers and shells and botanicals!
When I started with fmq, that was not easy. Piecing with accaracy is not either!


Ik heb van de week vier blokken van de quilt along genaaid. Nu is het weer tijd voor quilten uit de vrije hand. Ik heb mooi zwart en wit katoen voor krullen, veren en schelpen! Toen ik begon met fmq was het ook niet makkelijk, maar accuraat blokken naaien is dat ook niet.

 Finished blocks of the quilt along so far.

Friday and Saturday there is a exhibition at the local quilt shop in Amsterdam Oostzaan and allthough we had to baby sit this weekend in Utrecht (40 km drive to the exhibition), I have to go. It is such a pleasant shop with friendly people!

Er is een exibitie van quilts van cursisten van Quiltshop De bricoleur in Tuindorp Oostzaan in Amsterdam. En hoewel we op onze kleinkinderen moeten passen in Utrecht, ga ik er toch naar toe. Het is zo'n fijne winkel en je wordt er altijd vriendelijk geholpen! En ik sta verbaqasd van wat er altijd te koop is! Ik ben er nog nooit voor niets geweest.


I finished this week a fmq sampler  and the three dolls quilts. I used the failed blocks of the quilt along for these quilts.
Uit de mislukte blokken van de quilt along heb ik deze week nog drie poppenquiltjes gemaakt. Verder heb ik een proeflapje gemaakt met veren en een vuller uit de vrije hand.


It is so nice of you for stopping by, I love to hear from everyone of you, so please feel free to leave a comment.

If you have a question I will try and respond via e-mail. Please make sure your blogger profile is linked to your e-mail, otherwise I wont be able to e-mail you back.

If you need to reach me feel free to e-mail me at maartjequilt@gmail.com

Thanks so much for reading

Keep quilting!

Maartje Quilt
Amsterdam

dinsdag 27 augustus 2013

Pleasant surprise, quilt along and hyperquilting

Surprise, surprise! My daughter and her daughter came to visit us yesterday. I planned to sew, but was so glad they came! I met them at the station. We took the ferry over the river IJ and had a cup of coffee at a terrace with view over the river IJ with all the boats. The terrace is next to the ferry on the picture. So Salijn, my grand daughter, could watch all the boats on the river and I could talk with my daughter, Rose. 

Verrassing! Mijn dochter en kleindochter kwamen vandaag. I heb ze van het centraal gehaald en we hebben koffie gedronken op het terras van Café De Pont naast de pont in Amsterdam Noord.


We had a lot of plans but time flies and they had to go home. It was so good to have them with us. So I have little sewn yesterday. I finished in the evening a sampler with hyper quilted feathers and bananas filler.

Het was fijn dat ze er waren maar wat vliegt dan de tijd. Dus voor we het wisten moesten ze alweer naar huis. Ik heb dus weinig naaiwerk gedaan gisteren. Ik kon neg net ś avonds deze proeflap met een hyper geguilte veer afmaken. Ik heb een banaanpatroon als vuller gebruikt. Makkelijk te naaien. Je kan steeds alle kanten op en sluit jezelf dus niet snel op. Ook is het patroon goed gelijkmatig te houden!


I love the bananas filler. It is easy to sew this filler and it forgiving. Easy to change direction, so little chance to be locked up. I will post a tutorial next week. I have to sew another sampler to make it a gift! I am not sure to sew the second in blue too or another color.

Second finish today is the third block for the Aiming for accuracy quilt along.

Ook heb ik een derde blok genaaid voor de Quilt Along die bedoeld is om accuraat te leren blokken te naaien.


For me it will be a scrappy quilt. The blocks are getting better and better. One thing I learned is the importance of squaring a block after sewing. Every time I had to trim a little, before piecing a block or triangle to another piece. Not every corner is 100% all right. When something is wrong, I try each seam three times and then I leave it as it is. In The Netherlands we say: 'The fun should continue!"
My piecing is improving and the last blocks of this quilt along need to be perfect!

Het wordt voor mij een quilt van lapjes die ik bij elkaar graai uit mijn doos met restlapjes. En inderdaad leer je met de tutorials beter quilten. Het blok is zeker niet perfect. Na twee keer uithalen, haal ik niets meer uit. Het moet leuk blijven! De laatste blokken van de quilt along moeten wel perfect zijn. Inmiddels heb ik wel geleerd om de blokken steeds op maat te snijden voor ik ze aan een ander lapje naai.

I made another mistake today. I pieced the biggest block of the sew along. When I finished,it was not the block of the quilt along! I made my own creation! I pieced the wrong squares together because I thought I could do it without the tutorial. So wrong! So I made 3! doll quilts out of the block and tomorrow is another day. Tomorrow I will follow the tutorial step by step to finish the right block.

Vandaag heb ik het vierde en grootste blok geprobeerd te naaien, maar toen het blok zag het er anders uit dan moest. Morgen doe ik dat over en dan lees ik het voorschrift goed. Ik heb van de blokken  drie!poppenquilts voor mijn kleindochters gemaakt. Het is dus een enorm groot blok.

Stippling with loops. An easy filler. Fun to stitch.

Loops and flowers filler

My stippling improved a lot and it is going easy!

I love free motion quilting the little quilts, but it is a lot of work piecing and binding fore 15 minutes of free motion quilting fun! There is a lot to do before my quilt along top is finished, but I like the idea of fm quilting a big quilt!

Het was leuk om de poppenquiltjes te quilten, maar het is bij elkaar veel werk voor 15 minuutjes quilten uit de vrije hand. Ik verheug me nu al op het quilten van de veel grotere quilt van de quilt along!


It is so nice of you for stopping by, I love to hear from everyone of you, so please feel free to leave a comment.

If you have a question I will try and respond via e-mail. Please make sure your blogger profile is linked to your e-mail, otherwise I wont be able to e-mail you back.

If you need to reach me feel free to e-mail me at maartjequilt@gmail.com

Thanks so much for reading

Keep quilting!

Maartje Quilt
Amsterdam


zondag 25 augustus 2013

Quilt along: First pieced blocks

I discovered quilting in March and fell in love with free motion quilting, so I made a lot of samplers, some applique blocks and pieced some borders and just one quilt with fmq samplers. But I thought piecing a waste of time! But I see so many beautiful quilts I want to make with pieced blocks. I pieced a doll quilt and a table runner.  My granddaughter is happy with the doll quilt and I use the table runner sometimes, but I did a terrible job. I am a skilled seamstress, but piecing is a different kind of sport and I need to practice to do it well. Like I needed to practice quilting a lot.

Ik maak quilts sinds maart en vind het heerlijk om uit de vrije hand op de naaimachine te quilten. Maart een top maken met al die blocken uit kleine lapjes trok me niet. Ik heb het wel geprobeerd en ondanks dat ik netjes kan naaien,  is het maken van blokken een andere tak van sport, mijn eerste pogingen, een quiltje voor een pop en een tafelloper waren mislukkingen.

I like to join link parties. I meet lovely quilters and see a lot of blogs new to me with all kind of things I never heard off. I met a bloggers who joined the 'Aiming for accuracy quilt along', with tutorials and loads of information.

Ik neem graag deel aan linky parties om zo kennis te maken met quilters en allerlei zaken die met quilten te maken hebben en waarvan ik nog nooit gehoord had. Zo maakte ik kennis met een Quilt Along waar je leert heel accuraat blocken te maken. Op de website van de  Quilt along staan tutorialsw en een grote hoeveelheid informatie.


I joined the Facebook group of the quilt a long more than a month ago, but decided Friday to guilt along! I did not like the design of the quilt along (I know that is not important!), but I changed my mind when I saw so many colorful  blocks of the participants on Facebook.
So I looked  for some fabrics in my stash and bought some yellow and green fabrics and started with the quilt along. 

Deelnemers aan de Quilt Along hebben een Facebook-groep and daar heb ik prachtige blokken gezien van de deelnemers. Dus heb ik besloten deel te nemen.

First lesson accurate cutting, made me really humble. I was not as accurate as I thought! Two days later I finished two blocks. Yesterday block lesson 9 and today block lessen 2. I need correct one seam in the lesson 2 block, but I did that already two times. It is enough for today!. Tomorrow is another day.
And besides of learning to sew a HST I learned that piecing is fun to do too. But that is always even the most worse or dull subjects during my academic study, were interesting and some times fun after a lot of exercising and mastering it!

Ik dacht dat ik goed overweg kon met the rotary cutter, maar dankzij de eerste les van de Quilt along snijd ik ook kleine vierkanten en strips een stuk zorgvuldiger. Ik was stomverbaasd als een vierkant soms toch een kwart inch kleiner was dan bedoeld! Bij een sampler is dat niet erg, maar bij het maken van blokken wel. Behalve zorgvuldiger snijden en HST's naaien heb ik geleerd dat het maken van blocken leuk is. Ik heb nu het blok van les 2 en les 9 af. Ik ben tevreden over het blok van les 9.  Van het blok van les 2, haal ik nog een naad uit. Maar dat heb ik al twee keer gedaan, dus ik ga nu wat quilten uit de vrije hand en morgen is er weer een dag.
Block lesson 9 I rotated the green block 180 degrees.


Fabric used this week  0.5 yards
Fabric used year to date  25,5 yards
Fabric added this week  5 yards
Fabric added year to date  43,5 yards
                                           Netto added this year 18 yards


It is so nice of you for stopping by, I love to hear from everyone of you, so please feel free to leave a comment.

If you have a question I will try and respond via e-mail. Please make sure your blogger profile is linked to your e-mail, otherwise I wont be able to e-mail you back.

If you need to reach me feel free to e-mail me at maartjequilt@gmail.com

Thanks so much for reading

Keep quilting!

Maartje Quilt
Amsterdam


dinsdag 20 augustus 2013

My challenge #3 Tutorial FMQ Gingko leaves presents

How to sew Gingko leaves freehand.

When you add some gingko leaves to your fmq samples you have beautiful presents for your family and friends. They love them in every color combination! To fmq a gingko leave you need to know something of the anatomy of this characteristic leaves. 

1. The anatomy of a gingko leave
2. Freehand gingko leaves
3. Sampler-presents with gingko leaves.
4. Different shades of gingko leaves in one color.

1. The anatomy of a gingko leave
  • The leaves of the Ginkgo are remarkable for the fan of simple, forked veins. The veins are slightly raised and give a ribbed appearance to the foliage.

When you look well at the veins you see they are forked and not branched
  • Most of the gingko leaves are notched with a deep slit in the middle.
  • Elongated petiola as long as the foliage with a little knot at the end.

2. Freehand gingko leaves
The shape of the leave and the ribbed foliage, made the gingko leave easy for freee motion quilting.  Look well at the pictures of some gingko leaves. Look at the veins. the shape of the petiola and the foliage. You find much more drawings and pictures of gingko leaves here.
  • Draw some freehand gingko leaves on paper. Draw untill you know you can easy draw the leaves.
  • Sandwich your sampler for a fmq filler.
  • Choose a dark, medium and light thread of the same color.
  • Before you free motion quilt the filler on your sampler, you need to embroider the gingko leaves. Decide where you want to sew the gingko leaves on your sampler.
  • If nescesary mark with five dots the place where you want to sew a gingko leave like in the picture below.
       
  • FMQ the contour of a gingko leave with the darkest color. The slit is always right above the petiola. Sew a little knob at the end of the petiola.
    Sew the contour a second time.

  •  Sew with the same color veins and ends in the knob.

  • Sew with the medium color veins. Starts at mark A and finish in A.


  •  Sew with the light color veins. Starts at mark A and finish in A.


  • After finishing your gingko leaves: free motion quilt the filler or fillers on your sampler. 
  • Square your sampler and bind it with fabric in a color which matches your gingko leaves.

3. Presents from your samplers

Sampler pebbling

sampler fmq stippling, filling the space between the gingko leaves
4. Different shades of gingko leaves in one color. 

The sampler with blue gingko leaves has laeves in three shades of blue. To embroider these you need threads in four shades of blue: dark (D), medium dark (MD), medium (M), medium light(ML), light(L) and white (W).
Use for the darkest shade of leaves: D, MD and M thread.
Use for the medium shade of leaves: MD, ML and L thread.
Use for the lightest shade of leaves: ML, L and W thread.


It is so nice of you for stopping by, I love to hear from everyone of you, so please feel free to leave a comment.

If you have a question I will try and respond via e-mail. Please make sure your blogger profile is linked to your e-mail, otherwise I wont be able to e-mail you back.

If you need to reach me feel free to e-mail me at maartjequilt@gmail.com

Thanks so much for reading

Keep quilting!

Maartje Quilt
Amsterdam

donderdag 15 augustus 2013

Friday again

Friday again. Strange week with the funeral of my daughters father in law. It was a very special person and it was a very special funeral with a meeting in a sheepfold in the woods next to his house with lots of people. There was beautiful music made by musicians of the famous Dutch Royal Concertgebouw Orchestra Amsterdam.
There was a lot of laughter at the stories told about his live. When one of the speakers read  from a letter written by the deceased it was almost cabaret. The letter was a report of his staying in the hospital. So cynical but with a lot of humor. He told us in the letter about the fight of his body against the bacteria and how he saw the last ones with white flags crawling away ....... So wrong! He lost the fight. And despite the laughing, we will miss him.


But the rest of the week it was business as usual. The live of a retired teacher is very easy going!

I made a month ago 8 inchies. Four for a swap and four for me. I posted four, but still no sigh of there arrival. I think something went wrong with the envelop. I just put them in a envelop. Not so smart with the embellishment. So I sew the same embellishment on the four remaining inchies and posted them between cardboard with a lot of tape in an envelop. So nothing can go wrong now, I hope.


Inchies with mini micro stippling (pebbles, McTavish, stippling and paisley.)

I made a giraffe bloc for a dolls quilt.


I had two requests for the pattern of my giraffe baby quilt with tinkling horns and rustling ears. So I posted a free pattern with tutorial.

Another finish this week is this mini guilt 'Shells on a sandy beach' for the Alzheimer Art Quilt Initiative.


Another sampler for my shell guilt.


And I made four samplers with stippling and pebbles. Of course I made place mats out of the samplers. I hyper quilted feathers and gingko leaves with different thread colors and used matching binding.

Red colored gingko leaves with red binding. My stippling is still not consistent, but better.

Yellow orange hyper quilted feathers, with yellow orange binding. I love the pebbling but stippling is much quicker.


This weekend I will visit with four high school friends the place where we went to school. I finished only two presents. So there is a problem. In the Netherlands we have always a solution for those kind of problems. I will buy two bunches of flowers!


 Stash report:

Fabric used this week  4.5 yards
Fabric used year to date  25 yards
Fabric added this week  0 yards
Fabric added year to date  38 yards
Net used 2013  4,5 yards


Thanks everybody for visiting my blog. It makes my day!

It is so nice of you for stopping by, I love to hear from everyone of you, so please feel free to leave a comment.

If you have a question I will try and respond via e-mail. Please make sure your blogger profile is linked to your e-mail, otherwise I wont be able to e-mail you back.

If you need to reach me feel free to e-mail me at marelizeries[at]gmail[dot]com

Thanks so much for reading

Keep quilting!

Maartje

woensdag 14 augustus 2013

Free pattern: Giraffe baby quilt with bells in horns and rustling ears.


Giraf boxkleed met rinkelende hoorns en knisperende oren.


(under construction)


This quilt is not my idea. I found a picture at about com. It is from Bonnie Sneed. I made the pattern and add bells in the horns and rustle plastic in the soft, flappy ears.


Het ontwerp is van Bonnie Sneed. Ik heb er bellen in de hoorns en knisperende oren aan toegevoegd.


Finished size 32" x 40"       80cm/100 cm
Time to sew: 4-6 hour.       Tijd: 4-6 uur


The quilt is a applique giraffe with flappy inner ears, flappy horns and hair between the horns. A small sashing of 1 inch, a 4 inch border with corners.

Het quilt is een geappliceerde giraf met knisperende binnenoren en hoorns met een belletje erin.


Ingredients:
Back: 1 yard blue fleece
Blue: 25 inch
Giraf print: fat quarter
Pantherprint: 0,25 yard
Monkey print: fat quarter
Scraps: soft white for ears and horns, black cotton for eyes, sand colored for snout.
Some threads for 'hair'
Two small, round metal bells and some rustle plastic 

Instructions: 
Cut the fabrics
Blue:  one piece 22,5  x 30,5 and four pieces 4,5" square
Panter print: sashing  
        • two pieces 22,5" x 1,5",
        • two pieces 40" x 1,5",
        • four pieces 4,5" x 1,5",
                     binding:  4,3 yard (1,5 or 2 inch width)

Monkey print: 2 pieces 4,5" x 22,5 "
                        2 pieces 4,5" x 30,5 "

Top:
2. Sew the 22,5" sashing strips to the top and bottom of the blue fabric block.
3. Sew the 22,5" border to top and bottom of the top.
4. Sew 40" sashing strips to the long sides of the top.
5. Sew 4,5" width border (blue square - 4,5" sashing strip - 30,5 " monkey strip -  4,5" sashing strip - blue square. (2x)
6. Sew the borders to the long sides of the top.

Applique
7. Print out the giraffe picture and enlarge with a photo copier or draw a giraffe
    on paper.
    Your giraffe is big enough when the ears are partly on the monkey border.
    Height with horns about 32", 26" width.
8. Cut out the pieces of the giraffe, both white inner ears two times and horn
    four times.
5. Sew withe ears together and turn. Fill with a some rustle plastic. 
6. Sew horns, turn and fill with batting and a small metal bell.
7. Pin all parts of the giraffe on the top.
    The horns, hair and ears 1/4 inch under the hat.
8. Use a satin stitch or zigzag (width 3) to sew the parts on the top. Use for the
    eyes black  thread and give the eyes a twinkle with  some white stitches.
    Do not applique the horns and white ears. They are fixed to the top when you
    stitch the hat on the top. 

9. Sew the mouth, nose and stripes on the snouth with a satin or zigzag stitch     
    (wdth 2)
9. Sandwich your guilt, quilt it and bind it.


Back: 1 yard blue fleece
Blue: 25 inch
Giraf print: fat quarter
Pantherprint: 0,25 yard
Monkey print: fat quarter
Scraps soft white fabric for ears and horns and scraps of black cotton for eyes, scrap of sand colored cotton for mouth)
Some threads for 'hair'
Two small, round metal bells and some rustle plastic

1. Snijden van stoffen
Blauw: rechthoek 22.5 inch x 30,5 inch en vier blokken 4,5 inch x 4,5 inch
Panter print: stroken 1.5 inch
        • 2 x 22,5 inch
        • 2 x 40 inch
        • 4x 4,5 inch
        • 150 inch (1,5 of 2 inch breed) voor de rand.
Apen print: 2 stroken 4,5 inch x 22,5 inch
2 strokes 4,5 inch x 30,5 inch

2. Naai de top.
   -  Naai eerst panter stroken en apen stroken van 22,5 inch langs de lange kant
      aan elkaar. (2x)

   -  Naai deze met de stroken aan de kortaan de korte zijde van de blauwe 
      rechthoek.
   -  Naai de panterstrook van 40 inch aan de lange zijde van de top. (2x)

   -  Naai 4,5 inch brede stroken aan elkaar in de volgorde: blauw, panter, apen,
      panter, blauw. (2x))

   -  Naai de  de verkregen strook langs de lange zijde van de top. (2x)
3. Print de giraf uit en vergroot de print met het kopieerapparaat of teken de
    giraf na op de gewenste grootte  (ongeveer 32 inch lang en 26 inch breed)
    De oren vallen gedeeltelijk op de rand.
4. Knip de delen van de giraf uit. 
5. Leg patroondeeltjes op de stof en knip uit. 
    Knip de witte oren en hoorns dubbel. 
    Knip de snuit ook eenmaal uit de tussenvulling.
   
Let op knip toeslag: oren en  hoorns 0,5 inch aan zijde die aan het hoofd komt,
    hoofd 0,5 inch toeslag aan zijde die onder de snuit komt, nek 0,5 inch toeslag
    aan boven en onderkant.
5. Naai de twee delen van de witte oren op elkaar, keer ze en vul met wat 
    knisper plastic. Oren moeten plat blijven.
6. Naai de twee delen van de hoorns op elkaar en keer ze. Doe wat tussenvulling
    om de belletjes stop dit in de oren en vul de hoorns verder op.
7. Speld de delen van de giraf op de top. Oren, nek, hoorns, haar en ogen 0,5
    inch onder de kop, kop 0,5 inch onder de snuit, nek 0,5 inch onder de snuit en
    over de panter rand.

    Leg onder de snuit de snuit van vulling.
8. Torn de naad tussen panter rand en blauwe rechthoek los op de plaats van de |   nek en naai de rand met de nek er tussen weer aan het vierkant vast. 
9. Gebruik een satijn- of zigzagsteek (steekbreedte 3) om de kop op de top te
    appliceren. Gebruik voor de ogen zwart draad en steekbreedte 2.
    De witte oren en hoorns worden vast gestikt met het appliceren van de kop.
10. Naai neus, lippen en streep in de snuit met een satijn of zigzagsteek.
      Steekbreedte 2    
11. Sandwich de top en back met de tussen vulling.
12. Naai zo dicht mogelijk langs de giraf met een rachte steek de sandwich door.
      (zo komt de giraf mooi vlak te liggen)
13. Quilt met een meandermotief de sandwich door. Quilt om de applicatie heen. 

Copy this picture and paste in a a document. Print it out and enlarge it with a photo copier.


Four placemats done, four to go!

It is a lovely week. Real Dutch summer. Not to cold, not to hot, sunshine with clouds most of the day and alomost every day some rain. We enjoy the summer at home. It is my first summer as a retired teacher.

I have finished today four samplers/place mats. I exercised stippling and pebbling. I love to penbble, but stipling is much faster. I combined this exercising it with hyper quilting feathers and gingko leaves. I hope my friends like it!


I planned to sew eight place mats, but this weekend I am with my high school friends in Emmeloord, the place where we went to school. I want to sew tomorrow something for my granddaughter Salijn, who has her birthday this weekend. I had to do some cleaning before I go and we have a dinner guest tomorrow. So busy enough.
I plan binding the place mats I cut from my samplers. So I will have presents four all four high school friends.


Thanks everybody for visiting my blog. It makes my day!

It is so nice of you for stopping by, I love to hear from everyone of you, so please feel free to leave a comment.

If you have a question I will try and respond via e-mail. Please make sure your blogger profile is linked to your e-mail, otherwise I wont be able to e-mail you back.

If you need to reach me feel free to e-mail me at marelizeries[at]gmail[dot]com

Thanks so much for reading

Keep quilting!

Maartje

zondag 11 augustus 2013

Alzheimer Art Quilts Initiative quilt missing

We went with friends to a baseball game this afternoon. Both men played baseball a long, long time ago. My husband played even in the Dutch team.
It was nice weather and a tie game. The Dutch champion won with 2-1 in the last inning.
One  of the biggest stadiums of The Netherlands (cap. 2750) !
In The Netherlands soccer is much, much bigger than baseball. Today the stadium was almost empty! I think about 200 spectators. But we had fun!

I made two mini quilts for the Alzheimer Art Guilt Initiative and I sent them by post. One of the quilts is somewhere between The Netherlands and the United States.


It is no problem.  I promished to send another one. I love quilting shells, so I decided to combine some practice with my promish.
I did not quilt this time shells on purple cotton but I tried cotton with the color of sand at out North Sea beaches. I used three multi colors polyester thread with the colors of shells. The binding is cotton with the same color as one of the shades of the multicolors.

'Shells on a sandy beach'  (8 x 12 inch)
I made this Alzheimer Quilt it in memory of my grandma. As long as I know we were looking  for shells on the beach together, I do not mind she had forgotten!
Tomorrow it is on the way to the United States.


Thanks everybody for visiting my blog. It makes my day!

It is so nice of you for stopping by, I love to hear from everyone of you, so please feel free to leave a comment.

If you have a question I will try and respond via e-mail. Please make sure your blogger profile is linked to your e-mail, otherwise I wont be able to e-mail you back.

If you need to reach me feel free to e-mail me at marelizeries[at]gmail[dot]com

Thanks so much for reading

Keep quilting!

Maartje

vrijdag 9 augustus 2013

Friday again!

Another sunny week in Amsterdam. I went with my daughter and both granddaughters to the swimming pool. Salijn is my granddaughter and Sascha is my husbands granddaughter. They are not often together, but they get along well. I love to hear them talking to each other while playing and it is fun to see Salijn imitating big Sascha!
After finishing her ice cream Sascha 'helps' Salijn with eating her ice cream! It is a joy to watch them!
I had a few quilt finishes this week


The second fmq-tutorial for my own challenge: exercising micro-fmq on postcards is posted on my blog.


I finished three samplers that I already gave away as place mats to friends who were my neighbours in the street where our children are born and raised.

I finished my second hyper quilted feather sampler

It a gift together with the one I finished last week. Micro quilting and hyper quilting is so fun to do. I am practising  for a big, white whole cloth.

The two samplers may look great on a picture, but I have to practice a lot before I can start working on my whole quilt. I know not all the patterns are consistent enough and I make to much mistakes. My friends do not see it, but I always sew with 'my mothers eyes'. My mother was a talented sewer and a teacher. She was always very critical when I was sewing. I learned sewing sitting in her room when she was teaching or sewing. She had patience with her pupils, but she wanted me to sew perfect like she did. She let me rip out a lot! When I am sewing and make a mistake or finish something not 100% well, I still hear her voice!

I need to improve echoing and backtracking and I need to speed up with same accuracy too.
 
I try consistent stippling with two gingko leaves samplers. Consistent quilting is much more easy  on micro quilting scale. I assume that when I can keep stippling consistent on a bigger scale, it must be easier to keep other patterns consistent as well! I put one sampler partly on the other one before I take a picture, so you can not see the worst stippling!


My friends did not ever hold a needle in their hands hands. So they don't even know that stippling need to be consistent and were very happy with the presents!

Next weekend I am with even older friends in a hotel in Emmeloord. That is the place where we went to high school together. We have a weekend together every year. I make for them place mats like this ones in different colours, all with stippling! So after next week my stippling much be almost perfect!


I start with two UFO's this week as well. Two 'Balloon ride' play quilts. The balloons and two girls are finished. I want to finish one  quilt this weekend. I hope I can give it to my youngest daughter, who comes home Sunday from Africa.


So there is a lot to sew!

Keep quilting!


woensdag 7 augustus 2013

Gingko leaves!

I finished today two place mats for Marysia, a very old friend. She has her birthday today. Congratulations. I will go to her tonight with another friend. We lived together in the same small street when we get and raised our children!

Vandaag twee place mats gemaakt voor een vriending. Ik ga met een andere vriendin naar haar verjaardag. We woonden samen in het kleine hofje waar onze kinderen zijn geeboren en opgegroeid .

While collecting quilts on Pinterest I saw for the first time gingko leaves! Applique, thread play, pieced, painted, ...... I love the shape of this leave and wanted to feature them on a quilted place mat. One of my future projects will be a big quilt with big applique gingko leaves with fabrics dyed by myself. Not very original, I know. Before I do that, I need to exercise thread playing gingko leaves, this is my first attempt.
In Dutch gingko is: Japanese nut tree!

Sinds ik quilt en quilts verzamel op Pinterest, kom ik overal gingko blaadjes tegen. Ik vind de vorm van deze bladeren zo mooi, dat ik graag een quilt wil maken met grote appliqué gingko bladeren van zelf geverfde katoen in felle kleuren. Niet erg origineel, ik weet het. Om de vorm in mijn vingers te krijgen, oefen ik met thread play gingko blaadjes.
De Nederlandse naam 'Japanse notenboom' vind ik ook een mooie naam!

I did not use a pattern or a marker for the leaves. I used four colors blue and white. The  leaves are quilted in three shades of blue and white Brildor polyester. I quilted stippling between the leaves, just to practice. I want to quilt it consistent but did not succeeded again! So I have to practice more. Micro stippling is much easier than just stippling!
But I think my friend will be pleased with the presents!

Ik heb vier kleuren blauw en wit gebruikt voor de blaadjes. Voor de donkerste bllaadjes gebruikte ik de donkerste drie kleuren blauw, voor de lichte blaadjes de twee lichtste kleuren blauw en wit.
Ik heb stippling gebruikt tussen de bladeren en ben er weer niet in geslaagd het patroon regelmatig te houden. Meer oefenen dus! Microstippling is een stuk eenvoudiger! 

Toch denk ik dat mijn vriendin blij zal zijn met haar cadeau!


Thanks everybody for your kind words!

It is so nice of you for stopping by, I love to hear from everyone of you, so please feel free to leave a comment.

If you have a question I will try and respond via e-mail. Please make sure your blogger profile is linked to your e-mail, otherwise I wont be able to e-mail you back.

If you need to reach me feel free to e-mail me at marelizeries[at]gmail[dot]com

Thanks so much for reading

Keep quilting!

Maartje

dinsdag 6 augustus 2013

Exercising micro quilting: Postcards out of samplers

Challenge Tutorial #2:  Kaarten uit een oefenlap/Postcards out of samplers
 
I prefer to exercise micro quilting on small pieces, pieces like the size of a postcard. It forces me to keep the scale of the patterns small and consistent. But bigger pieces are easier to move, because you can lay your hands flat on the sampler. That's why I like to practice micro quilting on postcards in batches of six.
For me sewing batches of postcards combines fun stitching with keeping my storage of postcards up to the mark!

Microquilten kun je het beste oefenen op kleine lapjes ter grootte van een kaart. Het dwingt je om de patronenen klein te houden en helpt om de grootte van de patronen regelmatig, vast te houden.  Ik maak zes kaarten tegelijk om dat ik op de grotere sandwich mijn handen kan leggen.

Tips and trics
- When you use contrasting thread you can see your stitches very well when you are sewing.

Contrasterend draad zorgt dat je de steken goed kunt zien.

- You do not need quality fabric for a postcard or sampler! I like to use a solid, shiny fabric for the top, because it gives beautiful cards. You can buy this fabric very cheap.
Goedkoop glanzende stof geeft mooie kaarten. Voor kaarten heb je geen kwaliteits katoen nodig!

- I use cheap, thick polyester batting it gives a bit trapunto effect.
Ik gebruik voor kaarten dubbeldikke, polyester tussenvulling. Dat geeft een 'trapunto' effect en de stukjes niet gequilte stof staat dan bol en strak!. Je hoeft er niet voor naar een quiltwinkel. Ik koop het bijvoorbeeld bij de Boerenbonthal op de Albert Cuyp!

You need for a batch of 6 postcards (4 inch x 6 inch):
Voor een oefenlap van 6 postkaarten heb je nodig:


  • Fabric/stof  for the top  (14,5 inch x 19,5 inch)
  • Batting (cheap polyester of some leftover)
  • White cotton/witte katoen  (6 pieces, 4 inch x 6 inch)
  • Contrasting (multi) color embroidery thread, polyester or rayon, and cheap thread for the back./Borduurgaren voor de top.
  • Something thin to make the card stiff, like thin cardboard. /Dik plastic of dun karton om de kaart stevigheid te geven.
    (6 pieces 3 1/2 inch x 5 1/2 inch)
  • Marker 


  1. Pin the top on the batting./ Leg top op de tussenvulling
  2. Mark your cards (4 inch x 6 inch) on the top with lines. Keep 0.5 inch space between the cards. 
  3. Markeer de kaarten met een halve inch tussenruimte.
  4. Choose your patterns and fillers. If necessary draw them on paper until you can draw them consistent and easy.
    Kies je patronen en vullers/ Oefen zonodig eerst de patronen op papier.
Sampler marked with 0,5 inch thick lines. Polyester tread for the back and multi color thread for the top.

4. Fmq your patterns on the marked cards on your sampler.
    Quilt je patronen op de lap.


\
Free motion quilting on the sampler. The space between the cards is filled with filler, just for practice!


5. Cut your sampler in postcards: 4 inch x 6 inch
Snij de kaarten uit je oefenlap.

6. Put a piece with cardboard on the back.
Leg het karton op de achterkant.

7. Pin the white cotton on the edges next to the cardboard on the back of each postcard.
Speld in de randen naast het karton de witte katoen op de achterkant.

8. Satin or zigzaq stitch around the post cards. Do not stitch in the cardboard.
Werk de kaart af met een satijn- of zigzagsteek. Stik niet in het karton.
  
Multi color gives nice edges!


8. Draw with a permanent marker lines on your postcard and write 'Postcard' on your card.
Trek met een pen lijnen op de kaart en schrijf er 'Postcard' op.


It is so nice of you for stopping by, I love to hear from everyone of you, so please feel free to leave a comment.

If you have a question I will try and respond via e-mail. Please make sure your blogger profile is linked to your e-mail, otherwise I wont be able to e-mail you back.

If you need to reach me feel free to e-mail me at marelizeries[at]gmail[dot]com

Thanks so much for reading

Keep quilting!

Maartje Quilt
Amsterdam